5 Ways You Can Speed Up A Slow SSD
We know that solid state drives (SSDs) are significantly faster than hard disk drives (HDDs), but over time, even your SSD, whether built-in or external, can slow down. This happens for a number of reasons, including low available storage, outdated firmware, overheating, and misconfigured power settings. Apart from that, an SSD that's about to fail also slows down considerably, and there's very little you can do about it. But for most users, that's rarely the case, especially if the SSD is relatively new, say 2 to 4 years old. On average, SSDs have a lifespan of 5 to 10 years, and they often outlast the PC itself.
A slow SSD typically results in increased boot time, reduced transfer speeds, higher application load times, and poor system performance. While some of these may sound like minor inconveniences, keep in mind that the problems tend to build up with time, and if not handled early, this can result in drive failure.
So, if your system has an SSD that is unusually slow, don't replace it just yet. Some quick optimizations and changes to the system settings might make it faster, and if you're lucky, even as good as new.
Free up storage on the SSD
One of the most important aspects that impact an SSD's performance is available free storage. It's widely recommended that you keep 15% to 25% of storage free on an SSD for optimal performance. Anything above that is good, but when available storage drops to 10% or lower, your SSD can start slowing down. Remember, you don't necessarily need to delete critical files to free up storage. Moving rarely-used, non-critical files to a flash drive or a cloud storage solution also helps. Additionally, operating systems come with built-in tools to clear storage. Windows, for instance, has two: Disk Cleanup and Storage Sense.
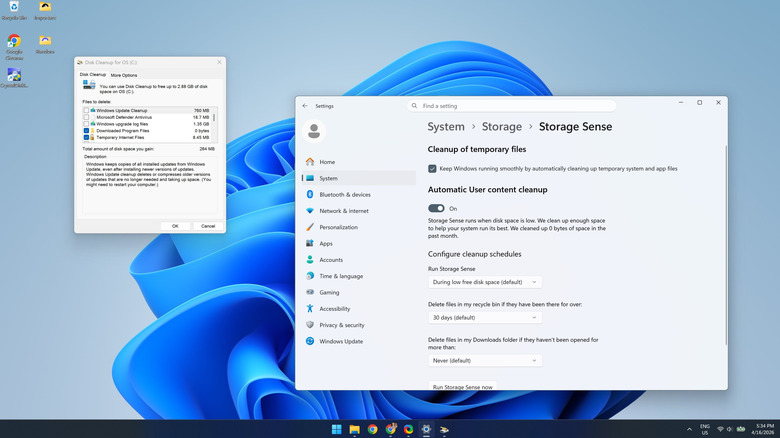
With Disk Cleanup, you can manually delete a wide array of unnecessary OS-related files and clear your Windows PC's cache. This includes temporary files, Windows update cleanup, Windows upgrade logs, system recovery logs, and more. This alone can free up gigabytes of storage. To use it, search for "Disk Cleanup," select a volume, tick the checkboxes for files you no longer need, then delete them. Also, make sure you check the "Clean up system files" section.
Storage Sense, on the other hand, automatically cleans up temporary Windows and app files at a regular interval. You can enable it through Settings > System > Storage > Storage Sense, where you can configure the frequency as well as the file type you want to delete. The best option is to use both Storage Sense and Disk Cleanup. While Storage Sense will operate in the background, you can run Disk Cleanup once every month or so for a deeper cleaning.
Run the built-in TRIM operation
While most people know the basics of how an SSD differs from an HDD, few understand what actually goes on in an SSD. To store data, your SSD needs empty blocks, and while new SSDs have many, older ones don't. That's why SSDs have native processes like garbage collection to identify and clear blocks that are no longer needed. To streamline garbage collection, there's another operation called TRIM. Its job is to notify the SSD in advance about these blocks. Also, TRIM, by highlighting invalid data, helps extend the drive's lifespan, since there are fewer program/erase (P/E) cycles.
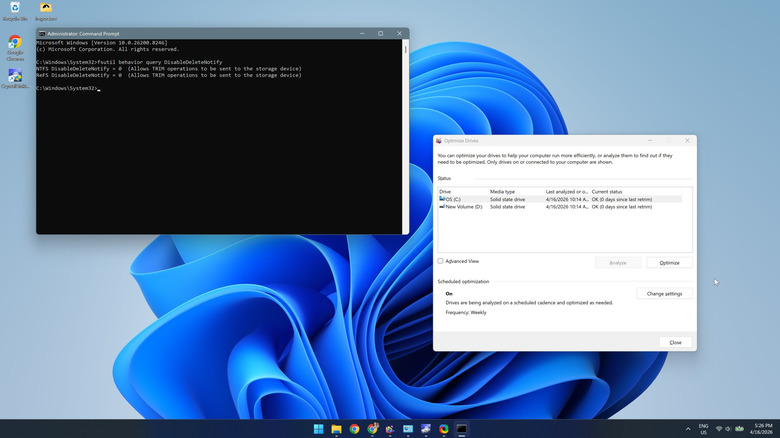
While TRIM is enabled by default on Windows, if your SSD is incredibly slow, there's a chance that it may have been turned off. To check that:
- Open the Search menu, type Command Prompt, and click on Run as administrator.
- Paste the following command into the prompt, then press Enter:
fsutil behavior query DisableDeleteNotify
- If the prompt returns DisableDeleteNotify = 0, TRIM is enabled, and if it returns DisableDeleteNotify = 1, TRIM is disabled.
- To enable TRIM, paste the following command into the prompt, then press Enter:
fsutil behavior set DisableDeleteNotify 0
Alternatively, you can run the "Defragment and Optimize Drives" utility to do that. In the utility, check whether the SSD has been trimmed recently. If not, you can select it from the list and click on "Optimize." Keep in mind that you don't defragment SSDs — instead, you optimize them. If you go with the former, you will end up reducing the storage drive's lifespan.
Update the SSD's firmware
While we make it a point to update the operating system, drivers, and installed apps, we rarely update the SSD's firmware. And it's just as critical, both for performance and improving the SSD's lifespan. When manufacturers release newer firmware versions, these include patches for known bugs, alongside performance and stability upgrades. In the past, users with Western Digital SSDs ran into BSODs after installing the Windows 11 24H2 update, which was fixed with a firmware update.
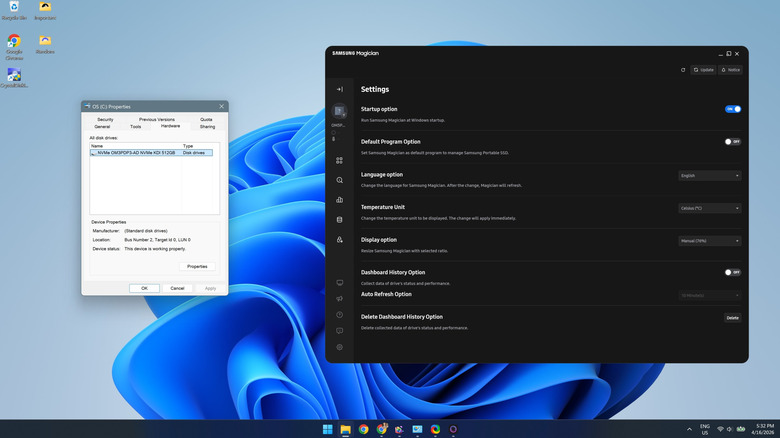
Updating your SSD's firmware is easy. You simply need to find out the SSD's manufacturer and download its dedicated utility. To identify the SSD's manufacturer, open File Explorer, go to This PC, then right-click on the drive and select Properties. Navigate to the Hardware tab and you should find the SSD's manufacturer and model. Now, search on Google for the dedicated SSD utility and download it. For instance, you have "Samsung Magician" for Samsung SSDs, and "Kingston SSD Manager" for Kingston SSDs. Within the utility, you should see an option to install any pending SSD firmware updates.
Optimize the power settings

Your system's power settings can also be responsible for a slow SSD, especially if the drive is configured to turn off upon inactivity. While it only adds a few seconds, these settings can affect the overall experience and make the SSD feel slow. Besides, if the system's power settings are not configured for maximum performance, you could again run into similar issues.
First, open the Control Panel, go to System and Security, then into Power Options and click on Change plan settings. Now, click Change advanced power settings. Under Turn off hard disk after, enter 0 for both "On battery" and "Plugged in."
Moving on to the computer's power plan, open Settings, go into System, then to Power & battery and expand Power Mode. Now, select Best Performance for both "Plugged in" and "On battery." You can also enable Windows' hidden Ultimate Performance plan for a bigger boost.
After making these changes, you should notice better SSD performance. With any luck, you'll also notice an overall improvement in system responsiveness and speed.
Minimize overheating and check the SSD's health
If you have done everything so far but the SSD still feels slow, the drive could either be overheating or failing. SSDs typically operate in the temperature range of 86 to 149 degrees Fahrenheit or 30 to 65 degrees Celsius. Anything higher affects the SSD's performance, reliability, health, and lifespan. Many modern SSDs also come with thermal throttling, where the drive lowers its performance to bring the temperature under safe operating levels as soon as it hits 70 or 75 degrees Celsius. But this directly impacts the user experience. So, it's necessary that the SSD is operated in the recommended temperature range.
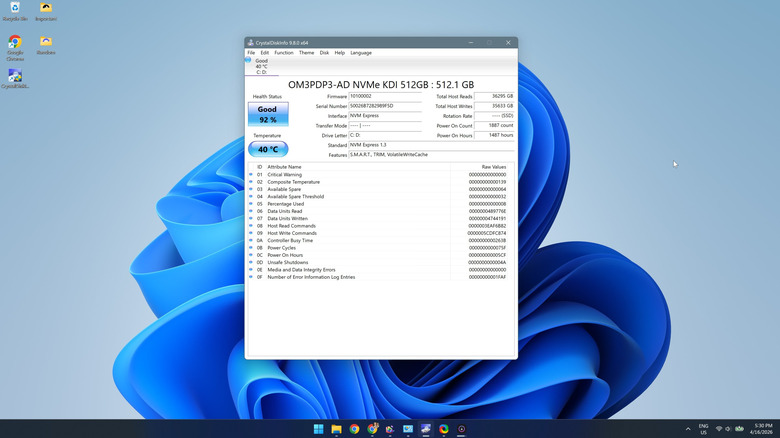
To check the temperature of an SSD, you will need a third-party utility like CrystalDiskInfo. It's available on the Microsoft Store for Windows users. After downloading, run CrystalDiskInfo, and you will see the drive's temperature on the main screen. If it's high and you are using a PC, make sure that there's optimal airflow and that the SSD is not placed under the GPU. Also, update the SSD's firmware. For laptops, clear any dust accumulation, consider buying a heatsink, or use a laptop cooling pad to lower the system temperature.
Within CrystalDiskInfo, you'll see another box titled "Health Status." This gives you an idea about the SSD's remaining life. If it's above 85%, your SSD is likely alright. When it's really low, your SSD may be failing, and it's time to back up the data. Also, keep a replacement ready for the SSD.